7 Stretching Exercises for Lower Back Pain That Actually Work in 2026
Child's Pose
Child's Pose, known in Sanskrit as balasana or shishuasana, originates from traditional yoga practices and serves as one of the best stretching exercises for lower back pain.
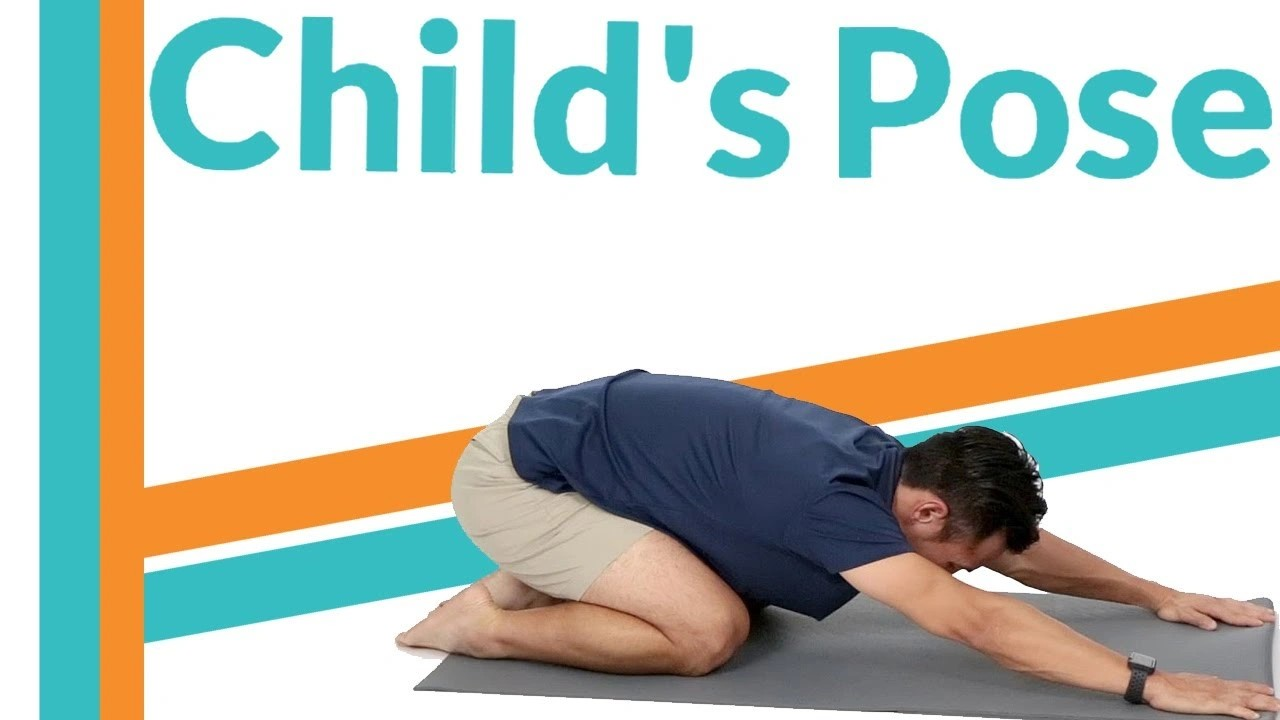
How to Perform Child's Pose
Start in a kneeling position with the tops of your feet pressed into the floor. Touch your big toes together while keeping your knees hip-width apart. Drop your hips back toward your feet as you exhale and bend forward to bring your forehead toward the floor. Allow your chest and belly to drop toward your thighs without lifting your buttocks away from your heels. You can extend your arms out in front with palms facing downward for a deeper shoulder stretch, or relax them at your sides with palms upward. Hold this position while taking long, slow breaths for as long as you feel comfortable.
Benefits of Child's Pose for Lower Back Pain
This pose takes pressure off your lower back and allows it to stretch and lengthen. A 2017 study of 100 medical students showed improvement in lower blood pressure and resting heart rates after participants practiced balasana for five minutes every day for 90 days [1]. The posture activates your parasympathetic nervous system, so it helps manage stress and provide chronic pain relief while relieving pressure in your lower back, pelvis, thighs, hips, and spine.
Modifications and Safety Tips
Never tuck your chin. Keep your head and neck relaxed or supported with a yoga block or pillow instead. Use blankets or pillows for extra support for your knees and chest. Focus on deep breathing, and don't push through any pain.
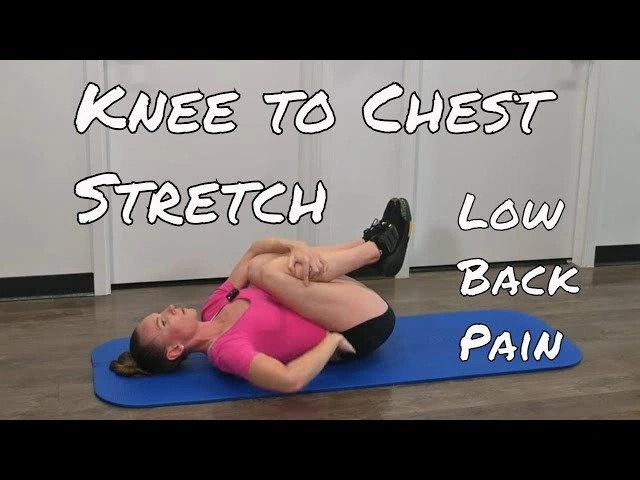
The knee-to-chest stretch lengthens your lower back and relieves tension and pain. This simple lying position targets multiple muscle groups.
How to Perform Knee-to-Chest Stretch
Lie on your back with your knees bent and your feet flat on the floor. Grab your right lower leg and interlace your fingers or clasp your wrists just under the knee. Keep your left foot flat on the floor and gently pull your right knee toward your chest until you feel a slight stretch in your lower back. Hold your right knee against your chest for 30 to 60 seconds. Relax your legs, hips and lower back [2]. Release your right knee and return to the starting position. Repeat 3 times for each leg [2].
Benefits of Knee-to-Chest Stretch for Lower Back Pain
This stretch targets the erector spinae, latissimus dorsi and gluteus muscles. It also affects the thoracolumbar fascia [3]. The movement helps with sciatica and general stiffness in the lower back area [4]. Your thigh pulls to your chest and lifts the bottom of your pelvis slightly. This extends upward to your lumbar spine [3].
Modifications and Safety Tips
If you have knee pain, clasp your hands behind the thigh instead of around the knee [5]. Keep your opposite leg flat on the floor while pulling your knee to your chest for more stretch [6]. Start with one leg only for safety. If you can perform it without pain after a few days, advance to lifting both legs [3].
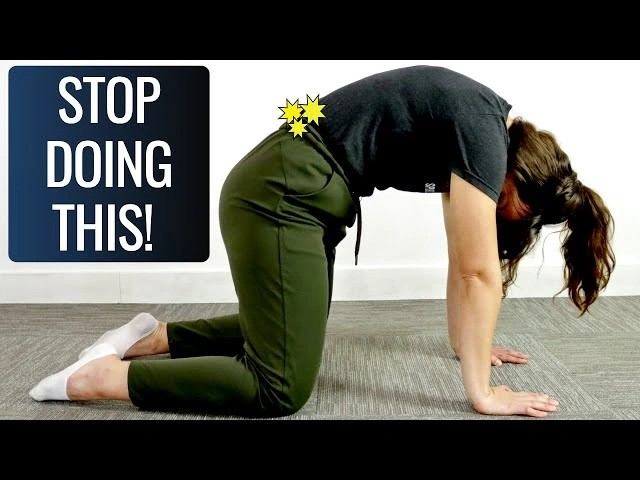
How to Perform Cat-Cow Stretch
Start on your hands and knees with your wrists under your shoulders and knees under your hips. Inhale and move into Cow Pose by dropping your belly toward the mat. Lift your chest and tailbone upward and gaze forward. Exhale and transition to Cat Pose by rounding your spine toward the ceiling. Tuck your tailbone and release your head toward the floor without forcing your chin to your chest. Repeat this flow 5 to 20 times and sync each movement with your breath.
Benefits of Cat-Cow Stretch for Lower Back Pain
This stretch improves spinal flexibility and releases tension from the upper back and neck. It stretches the torso and chest while activating core muscles. The coordinated breathing relieves stress and calms your mind.
Modifications and Safety Tips
You can perform the seated version in a chair with hands on your knees. Stand with hands on your thighs for office-friendly back stretches. Use blankets under your knees or blocks under your hands for wrist support. Keep movements within your pain-free range and avoid cranking your neck backward.
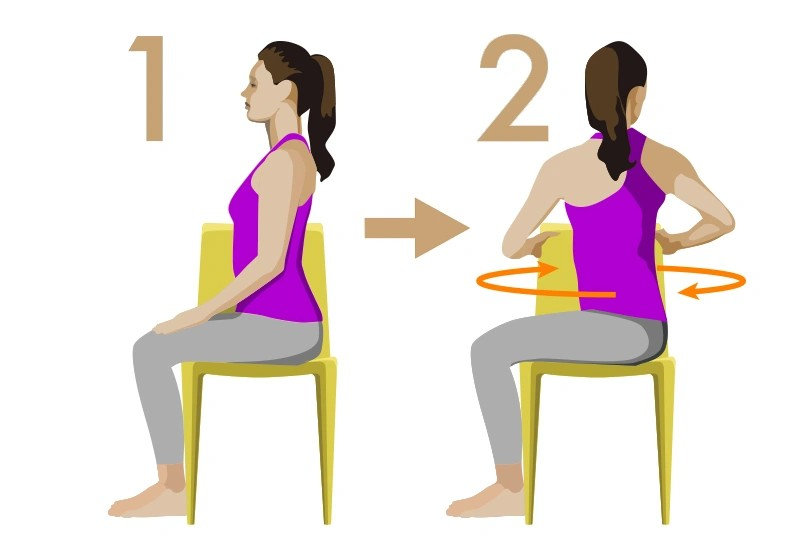
How to Perform Seated Spinal Twist
Sit on the floor with your legs straight out in front of you. Place your hands on the floor behind you with fingers facing away. Take your left foot and place it flat on the ground on the outside of your right knee. Inhale and bring your right arm up. Exhale and pull your right arm down. Place your elbow on the outside of your left leg. Turn your chest and head to the left. Hold this pose for about a minute while breathing steadily. Bring your head first and then your chest back to center. Repeat on the other side.
Benefits of Seated Spinal Twist for Lower Back Pain
This pose improves your spine's range of motion and helps reduce back pain and stiffness. Twisting postures tone the belly and can help relieve lower back pain. The stretch targets the obliques and lower back while opening up the hips and stretching the chest and shoulders.
Modifications and Safety Tips
Lengthen your spine before twisting by inhaling to create space. Keep both sitting bones grounded evenly on the floor. Straighten your bottom leg if your hips don't rest evenly. Avoid this stretch if you have osteoporosis, osteopenia, or low bone density. Loaded twisting motions can increase vertebral compression fracture risk.
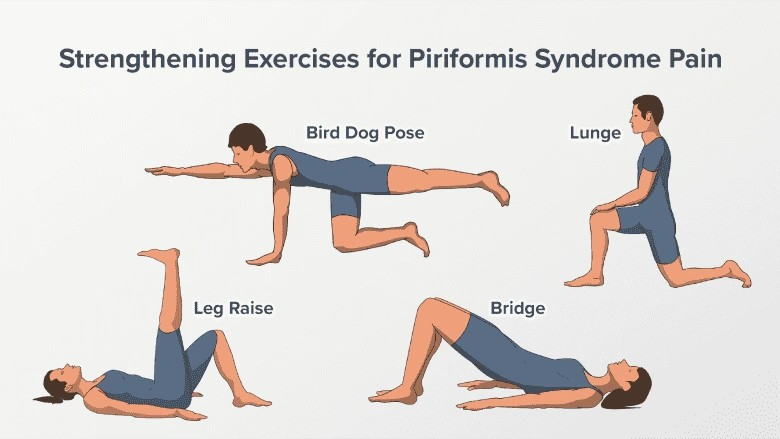
The piriformis muscle sits deep in your buttock area. Tightness in this muscle can irritate the sciatic nerve and cause radiating pain with numbness. Stretching this muscle helps loosen tension and provides relief from both lower back pain and sciatica.
How to Perform Piriformis Stretch
Take a seat with your feet flat on the ground. Place your affected leg over the knee of the other leg in a figure-four position. Keep your back straight and lean forward until you feel a stretch in your buttock. Hold this position 20-30 seconds and repeat 2-3 times on each side. You can also perform this stretch lying on your back: lie flat with both knees bent, cross your ankle over the opposite thigh, grab the back of your thigh behind the opposite knee and pull toward your chest.
Benefits of Piriformis Stretch for Lower Back Pain
This stretch reduces piriformis tension and eases sciatic nerve compression. The movement targets the hip and buttock area while relieving radiating pain that often accompanies lower back discomfort. Stretching helps create length and flexibility in tight muscles.
Modifications and Safety Tips
Warm up with light walking before stretching. Perform exercises on a flat, stable surface. Stop right away if you experience sharp pain or increased numbness. Avoid bouncing or jerking movements during stretches.
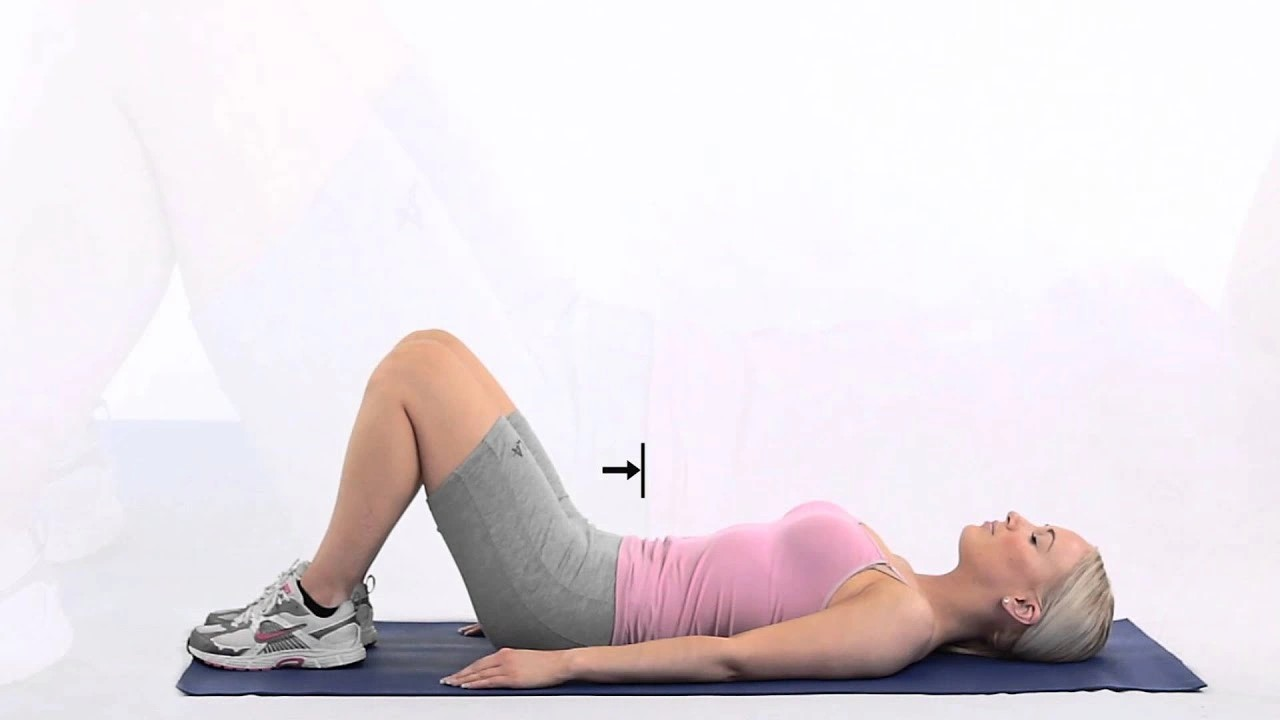
Pelvic tilts involve subtle rocking movements that strengthen core muscles and provide relief from lower back discomfort through controlled spinal positioning.
How to Perform Pelvic Tilts
Start by lying on your back with knees bent and feet flat on the floor, hip-width apart. Keep your arms by your sides. Inhale and tighten your abdominal muscles as you exhale. Press your lower back into the floor by tilting your pelvis upward. Hold the tilt for three to five seconds. Return to the neutral position and relax. Repeat 10-15 times.
Benefits of Pelvic Tilts for Lower Back Pain
This exercise helps maintain proper pelvic positioning and allows you to access the deep core muscles that create stability and strength. Proper pelvic alignment is vital to back health since the pelvis is part of the core. You can't control your spinal position if you can't control your pelvis position. Pelvic tilts strengthen the support muscles around the lower back, especially the abdominals, and provide a light back massage.
Modifications and Safety Tips
Stand with your back against a wall to perform standing pelvic tilts if lying down is uncomfortable. Place a pillow under the knees during supine pelvic tilts to reduce strain on the back. Avoid supine pelvic tilts if you're pregnant or have conditions that make lying on your back painful.
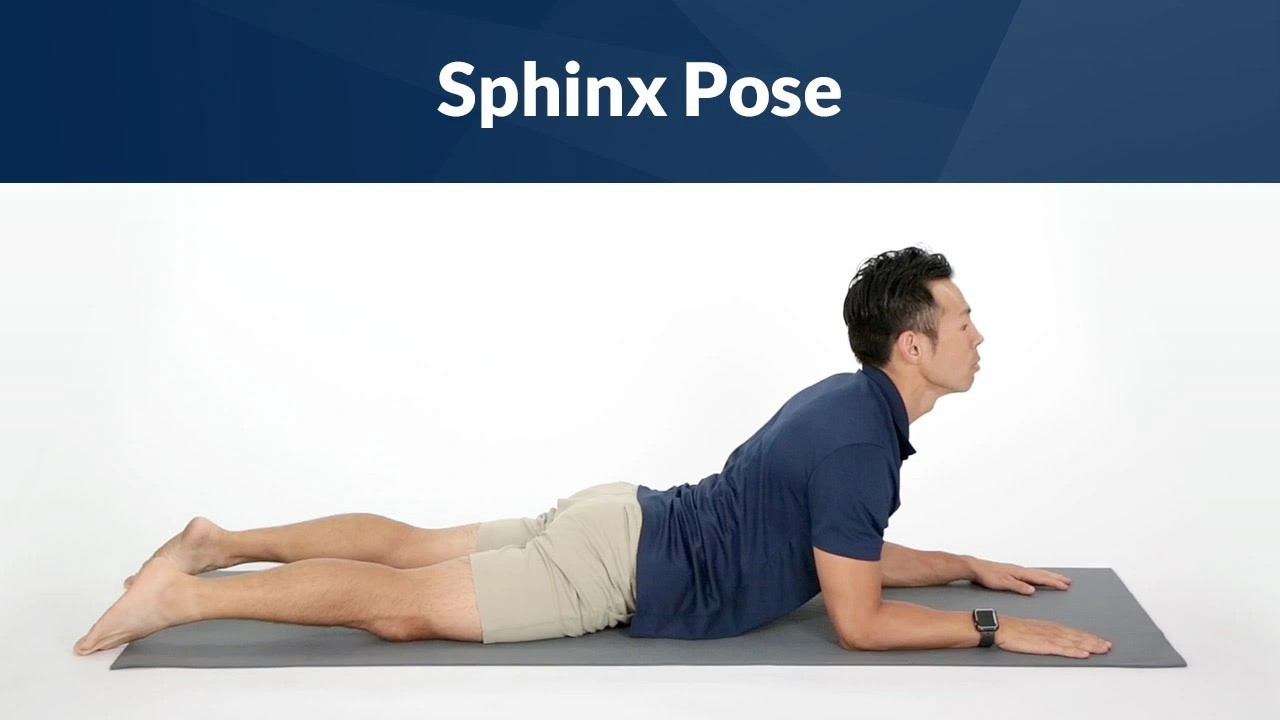
Sphinx Pose resembles the ancient Egyptian monument and provides a gentle backbend that improves spinal mobility while correcting poor posture.
How to Perform Sphinx Stretch
Lie face down on your mat with your feet hip-width apart. Your elbows should be directly beneath your shoulders. Bring your forearms flat on the floor, parallel to each other with palms facing down. Press firmly into your forearms and lift your chest away from the floor. Draw your shoulders away from your ears while you engage your glutes to press your pelvis into the mat. Keep your head and neck neutral with your gaze forward. Press the tops of your feet into the floor and engage your thighs. Hold for 5 to 10 deep breaths or 15 to 30 seconds.
Benefits of Sphinx Stretch for Lower Back Pain
This pose stretches the chest and psoas muscle while it strengthens your spine and back muscles. It counters the effects of prolonged sitting by restoring the natural curvature of your lower spine. The gentle backbend decompresses the spine and relieves tight muscles in the lumbar region without overloading it.
Modifications and Safety Tips
Move your elbows slightly forward to reduce intensity. Place a folded blanket under your ribs to cushion them. Avoid this stretch if you have elbow injuries, pregnancy, hernias or spinal fractures. Those with uncontrolled high blood pressure should also skip this pose.
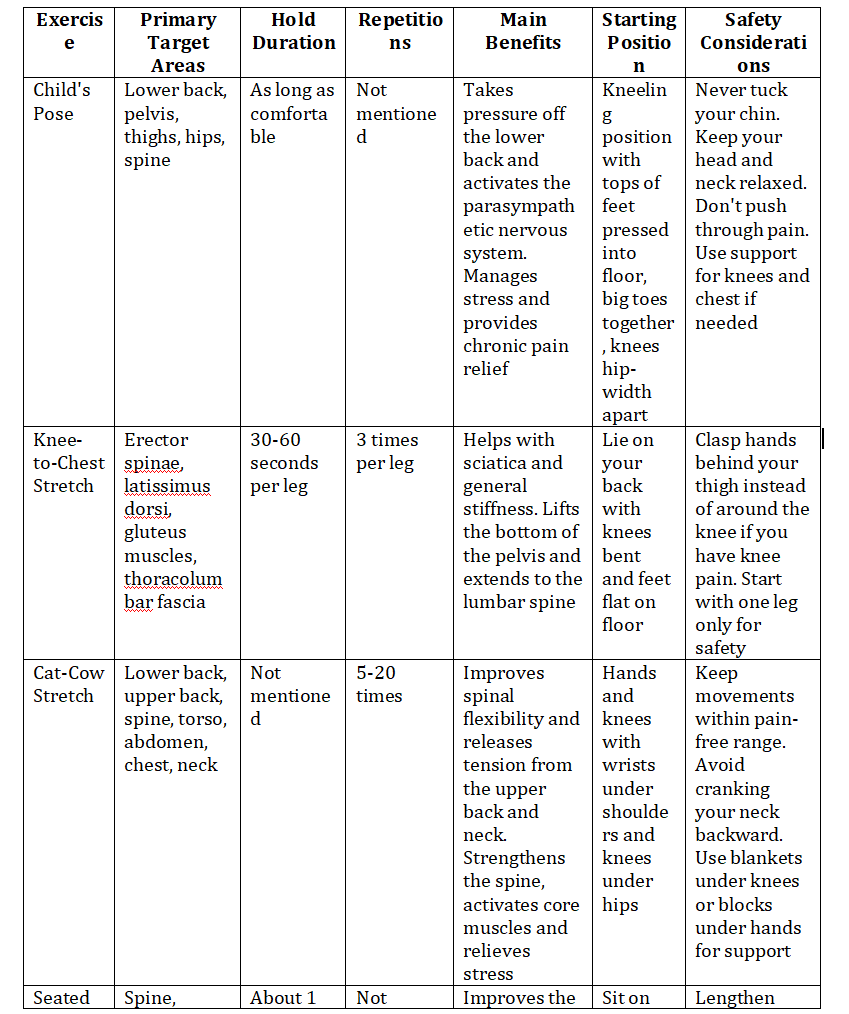
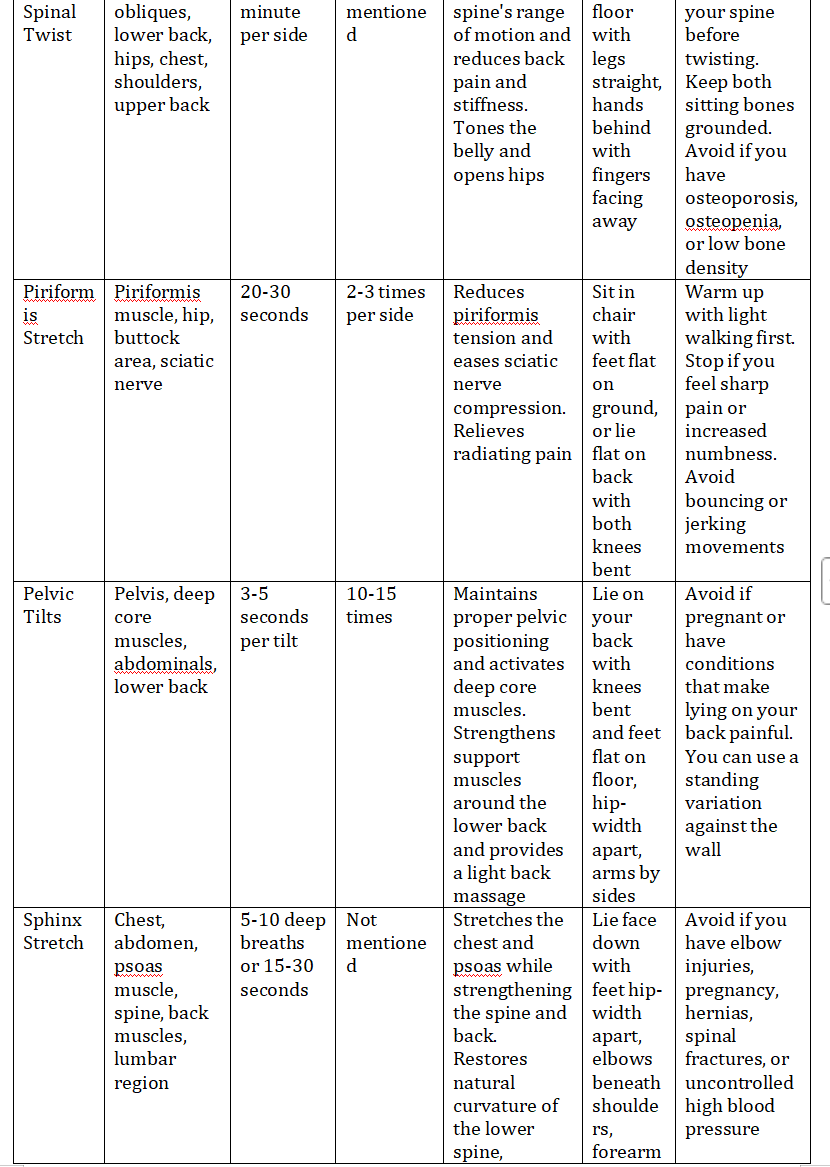
Comparison Table

Conclusion
By and large, these seven stretching exercises for lower back pain offer you practical solutions that you can start using right away. I've shown you exactly how to perform each stretch, from Child's Pose to Sphinx Stretch, along with their specific benefits and safety tips. The comparison table makes it easy for you to choose stretches based on your needs. Note that consistency matters more than intensity. Start with one or two stretches that feel comfortable and build your routine from there.
FAQs
Q1. Which exercises are most effective for relieving lower back pain at home? The most effective exercises include pelvic tilts, bridges, Cat-Cow stretch, bird-dog, Child's Pose, knee-to-chest stretch, and seated spinal twist. These movements target the lower back, core muscles, and surrounding areas to provide stability, improve flexibility, and reduce discomfort. Each exercise focuses on different muscle groups while helping to strengthen and stretch the spine. Q2. What is the most beneficial single stretch for lower back pain relief? Child's Pose is often considered one of the most beneficial single stretches for lower back pain. This gentle yoga position takes pressure off the lower back, allows the spine to lengthen, and activates the parasympathetic nervous system to help manage stress. It provides relief to the lower back, pelvis, hips, and spine while being accessible to most people regardless of fitness level. Q3. What are the three essential exercises everyone should do for lower back pain? The three essential exercises typically recommended are pelvic tilts, bridges, and the Cat-Cow stretch. Pelvic tilts strengthen core muscles and maintain proper pelvic positioning, bridges target the glutes and lower back for stability, and Cat-Cow improves spinal flexibility while releasing tension. Together, these exercises address the key components of back health: strength, stability, and mobility. Q4. How long should I hold each stretch to see results? Hold times vary depending on the exercise. For static stretches like Child's Pose, hold as long as comfortable. Knee-to-chest stretches should be held for 30-60 seconds per leg, while Sphinx Pose is typically held for 15-30 seconds or 5-10 deep breaths. Pelvic tilts are held for 3-5 seconds per repetition. Consistency matters more than duration, so focus on performing stretches regularly rather than holding them for extended periods. Q5. Are there any safety precautions I should take when doing lower back stretches? Yes, several safety precautions are important. Never push through sharp pain, and stop immediately if you experience increased numbness or discomfort. Warm up with light walking before stretching, and perform exercises on a flat, stable surface. Avoid bouncing or jerking movements, keep your head and neck relaxed, and use props like blankets or blocks for support when needed. If you have conditions like osteoporosis, pregnancy, or hernias, consult a healthcare provider before starting these exercises.
References
[1] - https://health.clevelandclinic.org/childs-pose [2] - https://www.healthline.com/nutrition/stretches-for-lower-back-pain [3] - https://www.verywellhealth.com/knees-to-chest-exercise-296870 [4] - https://www.hingehealth.com/resources/articles/knee-to-chest/ [5] - https://www.nyp.org/healthlibrary/multimedia/how-to-do-the-single-knee-to-chest-exercise [6] -https://myhealth.alberta.ca/Health/pages/conditions.aspx?hwid=sig44113